Starbucks Coffee Cupcakes

SBcupcakes-04

My boyfriend, Alex loves Starbucks coffee and today is his birthday. I decided to try and make him something simple, yummy, and fun. I am a Pinterist fan and discovered a few creative Starbucks birthday ideas. I also have a few food allergies, milk and gluten, so I needed to find a recipe that would work for me to eat as well. In the end I mixed a bunch of ideas I had and found together and came up with these cupcakes, which were a very big hit by the way!


Gluten & Dairy Free Coffee Cupcakes

makes 24 cupcakes ~ 20 minutes ~ oven at 350 degrees


3/4 cup (1 1/2 sticks) softened butter

2 cups sugar

2 cups gluten free flour

1 teaspoon tapioca flour

1 teaspoon xanthan gum

1/4 cup cocoa powder

1 teaspoon baking soda

1/2 teaspoon salt

4 tablespoons ground coffee or instant coffee mix

1 cup  almond milk

1/2 cup strongly brewed coffee

3 eggs


Cream butter and sugar together. Add coffee, milk & eggs. Mix well. In a separate bowl mix together dry ingredients. Slowly add dry ingredients to bowl of wet ingredients, mixing well.

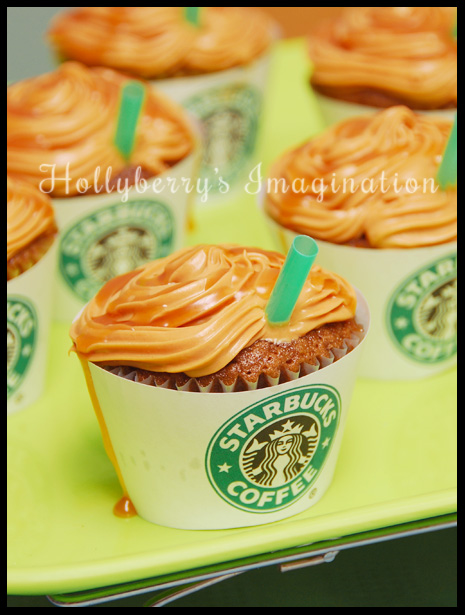
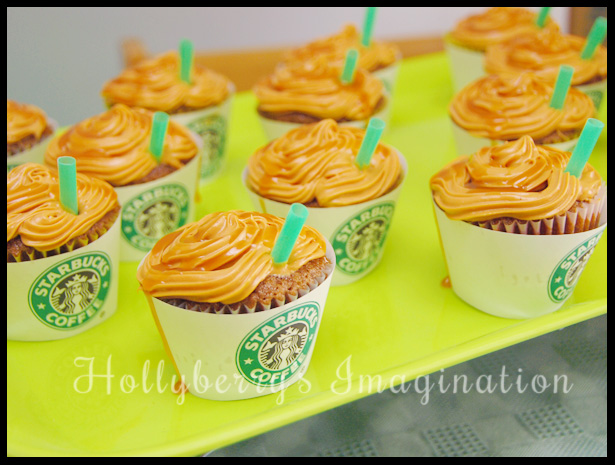
Alex’s favorite Starbucks drink is a Caramel Macchiatio so I tried to replicate that as best I could using all caramel flavored coffee and frosting.

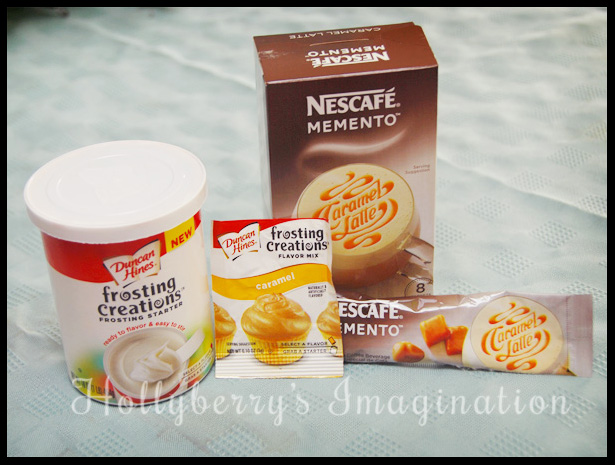
For the frosting I ended up using the Duncan Hines Frosting Creations with the Caramel flavored packet. I was a little pressed for time and have not found a homemade allergy-free frosting recipe I am happy with yet. This frosting however, proved to be  one of the best store bought frostings I have ever had!  For my coffee grounds/instant coffee mix I used this Nescafe Memento Caramel Latte mix. Later I discovered it did have a small amount of milk in it, but thankfully it did not bother me!

SBcupcakes-01

After the cakes were cool, I frosted them using a star shaped decorating tip so it would look sorta fancy and hopefully coffee-like. Then I printed and cut out my custom cupcake wrappers! Here is my template I used:

hollyberry-cupcake-wrap

For the logo, I simply looked up the image I wanted and added it to the document before printing. You can also have this template print to the back side of some pretty scrap booking paper for another type of custom and decorative look.

For the straws, I simply cut some green straws in 4 pieces and stuck them right into my “drinks”. Then I drizzled some caramel topping on!

SBcupcakes-02

These are an easy and fun way to add some personality to any party or event. You can easily transform them into most any company’s “drink” or flavor!

Feel free to share any of your own creations or ideas!!!

-Holly

Enhanced by Zemanta

Clay Bumble Bee

claybee02

Make an adorable little bumble bee from clay and wire.

Supplies: Sculpey III clay (my personal favorite clay to use), some 18-22 gauge wire (this size wire bends well, while still being sturdy to hold the weight of clay), and a pair of wire cutting pliers.

claybee01

Make two round yellow balls. One about 1″ diameter and the other about 1/2″ or a little less. Using the black clay make a little tail/stinger and two tiny eyes. And finally with the white clay create two eyes and two wings. Try to keep the wings less then an 1/8″ thick so they won’t be too heavy for your little bee!

Put the body together using a toothpick for support and attach his wings, stinger & eyes.

Using wire cutting pliers, cut and shape six legs for him to stand on and two antenna for his head. Add his legs and antenna to the rest of his body and he is ready to bake!

Preheat your oven to 275 degrees. Using a cookie sheet covered in aluminum foil, place your bee into the oven and back for 15 minutes. Be very careful when the clay comes out of the oven, it is VERY hot. Let everything cool for 15-30 minutes before picking up your object!

Enjoy your cute little bee!!!

claybee02

-Holly

Enhanced by Zemanta

Sweatshirt Bag

sweatshirtbag09

Have an old sweatshirt lying around that you don’t really wear, isn’t comfy or was grown out of? Maybe one you got at some random event for free or as a prize and now sits in the very back of your closet because it’s just not your style? I came up with the solution of turning it into nice little tote bag! It is super easy to make and only requires very basic sewing skills.

Supplies: sweatshirt, cloth scissors, sewing machine, thread, and about 30 minutes to spare!

sweatshirtbag02

Cut the shirt using the above diagram if you want to use as much of the fabric as possible and make as large of bag as possible. I used a size small basic sweatshirt. Of course you could also make it smaller if you wanted to, especially if you are using a rather large shirt. I simply wanted to see what size bag I could get from the small one I had.

Cut through both sides of the shirt so you get two of each piece. Center = front & back, Left side = sides, Right side = straps, and next picture below shows how I used the rest of the right side arm for the bottom piece (you only need one of these.)

sweatshirtbag05

To make the bottom of the bag I used the rest of the right side sleeve (in previous picture above).

sweatshirtbag03

Fold the strap pieces in half the long way so that the right sides are facing each other. Pin and stitch them!

sweatshirtbag04

Once the straps are stitched, use pinking shears or make a zig-zag pattern using cloth scissors to help prevent fraying as well as make it easier to turn right side out. Then you want to turn them right side out now. This proves to be pretty tricky, so try and be patient.

sweatshirtbag06

Pin the bottom of your bag to the bottom side of your front and back pieces and stitch them together.

sweatshirtbag07

Pin your side pieces to the sides and bottom of the bag. (It should start looking like a bag now!) Stitch everything together!

sweatshirtbag08

Hem the top of your bag byt 1/2 – 1 inches and pin your straps into place. Stitch everything together! I added a little extra stitching to the straps, seeing that they most likely will be getting the most wear and tear.

sweatshirtbag09

You now have a cute little bag and made a small dent in cleaning out your closet!

Please share any ideas or sweatshirt bags you create!

-Holly

Enhanced by Zemanta

Necklace & Key Rack

keynecklace-11

I have been looking for some sort of solution for keeping my necklace’s from getting tangled every time I take them off. I don’t wear them often, but every time I do it seems I have to spend 20 minutes untangling it first. So I came up with the solution of using small cup hooks and making my own rack. While I was at it I decided to update the key rack in our apartment. (Previously a few command hooks by the door, now a cute and colorful rack!)

keynecklace-01

Supplies: Some small pieces of wood or wood plaques from the craft store, acrylic paint, paint brushes, small screw in cup hooks, a ruler, a pencil, and some picture hanging command adhesive.

keynecklace-02

I started by painting all my wood plaques white to prime them. I wanted the bright colors to really pop and to use the least amount of coats of paint.

keynecklace-03

I then began to paint the face of them. I used 1-2 coats depending on the color. I wanted to ad more colors to the edges, but if you like this look of white edges you could stop here too!

keynecklace-04

This is how mine looked as I added multiple colors to the sides.

keynecklace-05

Once everything is dry you are ready to get some hooks on them! First decided how many hooks you want on each rack. For my key racks I used 3 and the for the necklace rack I used 5 since they are much smaller objects. Using a ruler and pencil I marked out evenly where I wanted the hooks to be.

keynecklace-06

The hooks will screw into most wood very easily right over your pencil marks, and then you will have a finished little rack!

keynecklace-07

To hang your rack on a wall you could drill a hole for it to sit on a nail or picture holder. Living in an apartment I wanted a solution that won’t hurt the walls and still is easy and looks great. So I used the picture hanging command adhesive (the kind that has Velcro basically.) The reason I choose this kind is because I wanted it to be stronger in order to hold keys and to hide completely behind the rack. Normal command adhesive needs a small piece of it showing in order to properly remove it later. This stronger kind can completely hind though because of how it uses Velcro to attach to your objects! In my picture you can sort of see how I essentially used 4 medium command adhesives and 2 sets of Velcro strips (they come with the adhesive.)

keynecklace-08

And there you have it! Some cute and colorful racks for keys, necklaces or other small objects!

-Holly


Woodchip Bugs!

woodbugs09

It’s spring! At least, it’s trying to be. Today is not working out to well weather-wise here in New England. As the warmer weather does start to come around, so do the bugs! These bugs however, are the kind that don’t bite and you might even invite to a picnic. They are very simple to make and so darn cute!

Supplies: Wood chip pieces from a craft store (you will need different size circles and teardrop shapes),  some wire (18-22 gauge seems like it works best), Pliers (the kind that will cut the wire too), Acrylic paint, Paint brushes, a black Permanent marker, Googly eyes, and some glue!

woodbugs01

Pick out the pieces you need for whichever bug you choose to make. Actual size of these shapes doesn’t really matter. The large ones I used for the bodies were about 1 1/4″. For the bee’s wings I clipped a corner of a teardrop shape so it looked a little more wing-like. Then start painting them whatever color you want your bug! I recommend 10 minutes of drying time before painting the opposite sides so they don’t stick to anything. Also, I found that two coats looked far better then just one.

woodbugs02

Once your top piece of your bug is completely dry, use a black permanent marker to draw a design on its back. For the bee I made stripes and the ladybug I made dots.

woodbugs03

Next, I start putting the bug together. I found this part to be rather tricky. I cut out 3 pieces of wire to sit over the bottom side of the body for the legs. (Note: I used 18 gauge wire, be careful not to just buy any wire. You want one that is easy to bend, but stiff enough to hold up your bug)  I wanted to just glue them all on, but that really didn’t work out so well… or at all for that matter. So instead I used a little tape to hold them all on before I could get the glue on. (another option could be a hot glue gun if you are not involving kids in this project.)

woodbugs04

Then I put plenty of glue on his back and put his head and then his back top piece on. I did end up needing some clamps (clothespins, or something similar) to hold some of them together while they dried. Once they were dry, they were standing up pretty good!

woodbugs05

Now you want to flip your bug over to glue his tail on. Let it dry and then help him back on his feet!

woodbugs06

Glue his wings on his back right behind his head. Also make some him an antenna out of wire and glue it on. I used super glue, because that is the only thing that seemed to work for that part. Regular craft glue proved to be too slippery and dry too slow and I didn’t want a large blob of hot glue on his head.

woodbugs07

Finally give him some cute little googly eyes!

woodbugs08

My finished bugs are about 1″ off the ground and 1 1/2″-2″ wide.

woodbugs09

These would be great projects to make with kids, give away as little gifts or even party favors!

Please feel free to share any bugs you create with wood chips, I would love to see them!

-Holly